>>
30-MINUTE MEALS! Get the email series now →


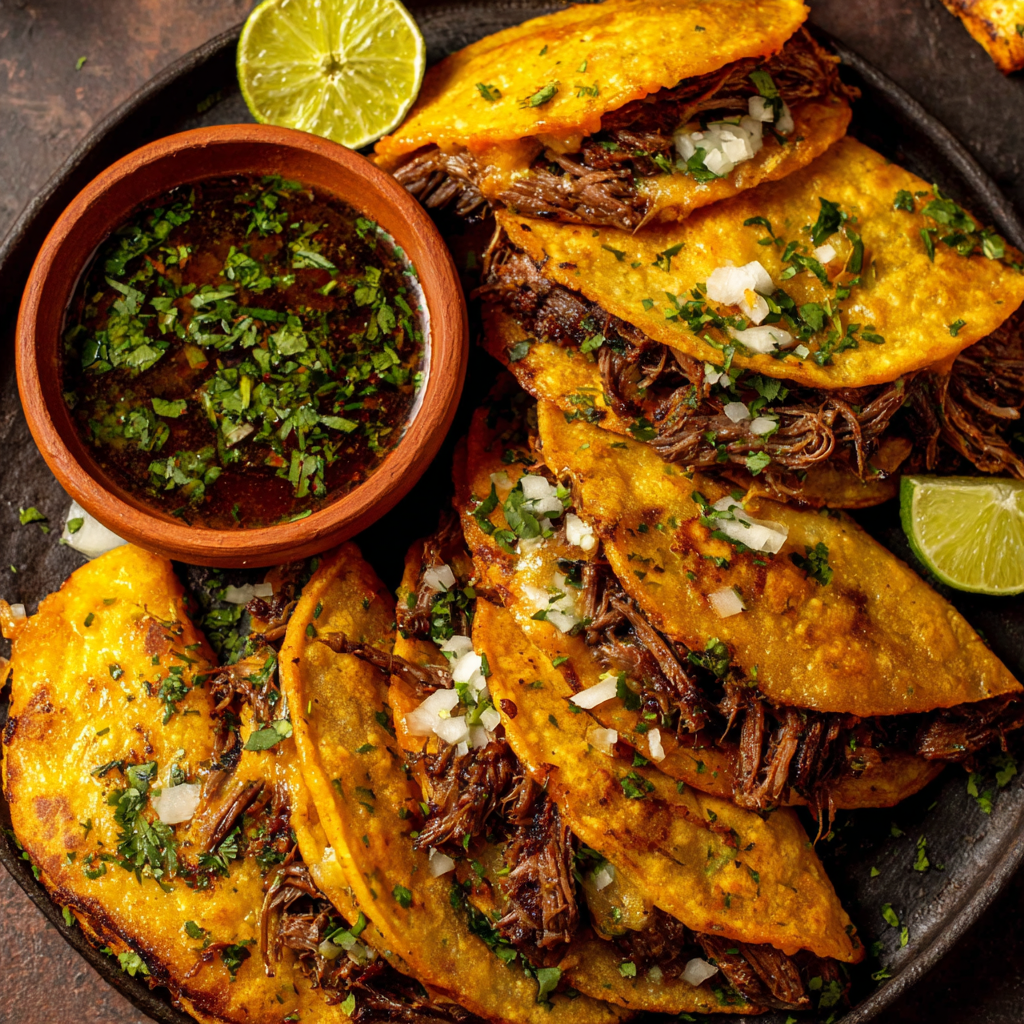
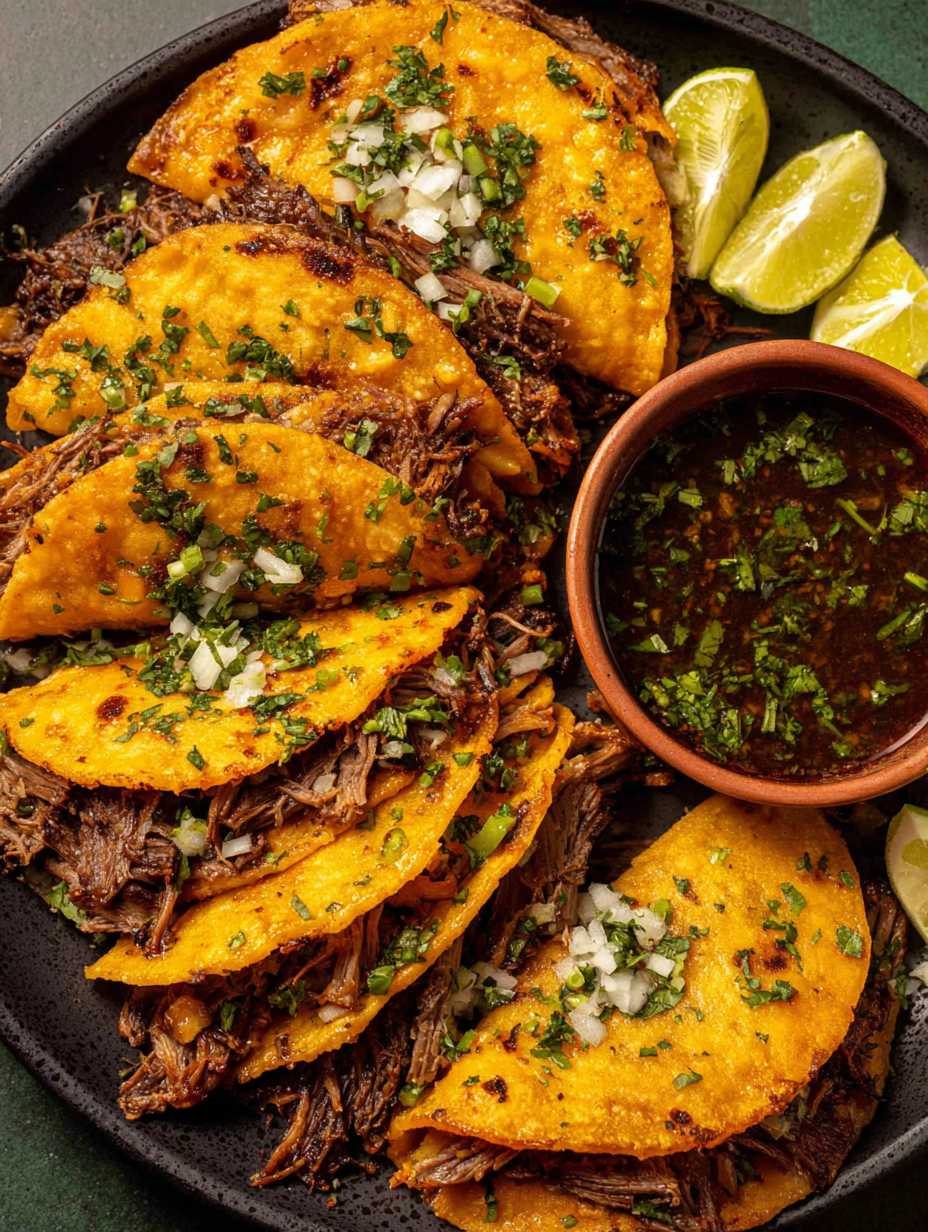
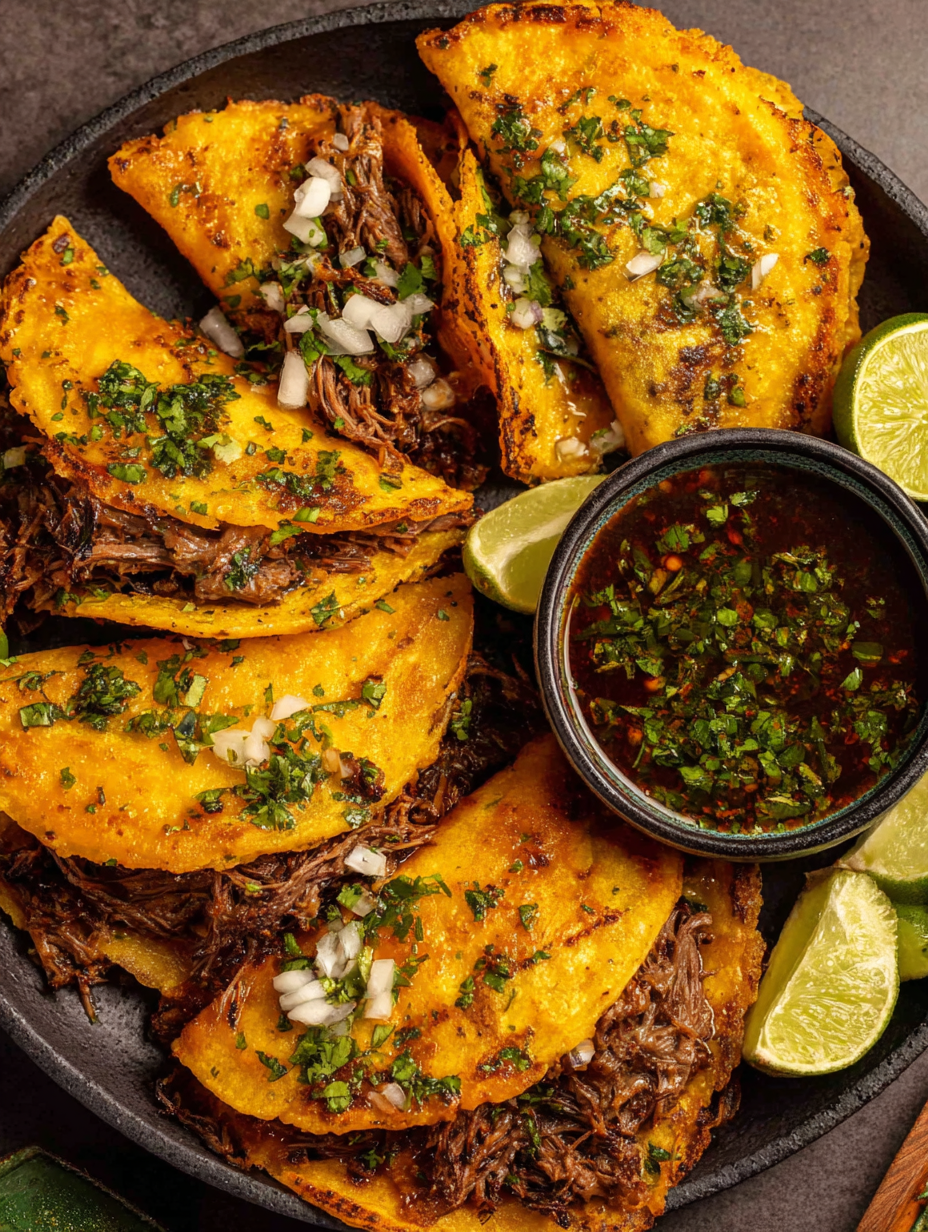
Tender shredded beef braised in a deeply flavored chili broth, crisped with melty Oaxaca cheese and served with rich consomé for dipping — my all-time favorite birria tacos, with make-ahead, gluten-free and dairy-free/vegan options.
This recipe for birria tacos is my absolute go-to whenever I want to impress a crowd or make weeknight dinner feel celebratory. I first developed this method on a chilly weekend when I wanted something more soulful than tacos from the street cart; after some testing and a few favorite tweaks, the result became our house specialty. The slow-braised beef soaks up a complex, smoky chili paste while the broth reduces into a fragrant consomé you’ll want to drink straight from a bowl. When tucked into a warm corn tortilla with a layer of Oaxaca cheese and crisped in a skillet, the contrast of tender, juicy meat and crunchy, cheesy exterior is unforgettable.
What makes these tacos special is the balance of texture and flavor: the long braise yields meat that shreds like butter, the dried chiles provide an earthy sweetness with a touch of heat, and the finishing step—dipping the tortilla in consomé before frying—creates that characteristic, slightly lacquered exterior that captures all the juices. I often serve these for gatherings; the smell of the pot in the oven always pulls family and friends into the kitchen. Whether you’re new to braising or a seasoned home cook, this approach is reliable, forgiving, and endlessly satisfying.
Personally, my favorite memory with this dish is serving it at a casual dinner where everyone stood around the counter, dipping tacos into consomé and trading bites. My youngest — normally picky about spicy foods — declared it her "best taco ever" after she ate two, which is how I knew I'd nailed the balance. The leftover consomé made excellent morning eggs for two days after.
My favorite part of this method is how forgiving it is. Even if you’re a little short on time, the chili paste can be made a day ahead and kept in the fridge, making assembly a breeze. Friends always comment on the brightness the pico adds; it cuts through the richness perfectly and keeps the tacos from feeling too heavy.
Store components separately for best texture: place shredded meat and braising liquid in a shallow airtight container to cool quickly, then refrigerate for up to 3–4 days. Tortillas keep best at room temperature wrapped in a clean cloth inside a covered container for 1–2 days or refrigerated for up to a week; reheat gently on a griddle to restore pliability. To freeze, portion meat and consomé into meal-sized vacuum bags or freezer containers and label with the date — they’ll keep well for 2–3 months. When reheating, warm the consomé and dip tortillas briefly so they soak up flavor without becoming soggy.
For a dairy-free version skip the Oaxaca and use mashed avocado or a dairy-free melting cheese alternative; many plant-based cheeses melt nicely in these tacos. To make a vegan option, substitute jackfruit or shredded king oyster mushrooms for beef and use vegetable stock in place of beef stock. If you prefer milder heat, reduce the chipotles to 1–2 or remove seeds from the chiles. For a quicker weeknight variation, pressure-cook the meat in an Instant Pot for about 60–70 minutes on high pressure instead of oven-braising.
Serve these tacos with a small bowl of warm consomé for dipping, a bright pico de gallo, sliced radishes, lime wedges, and extra chopped cilantro. For sides, a simple Mexican street corn salad or a crisp cabbage slaw with lime and chile flakes balances the richness. For a party, set up an assembly station with warm tortillas, shredded meat, cheese, onions, cilantro, and bowls of consomé so guests can build their own. Garnish with crumbled queso fresco if not dairy-free.
Birria originates from the state of Jalisco and is traditionally made with goat, though beef is a popular and widely accessible substitute in home kitchens. The dish historically celebrates special occasions and family gatherings, where slow cooking in a covered pot produced tender meat and a deeply flavored broth. Regional variations exist across Mexico and the U.S., with some versions leaning spicier, others smokier, and modern adaptations adding melted cheese for extra indulgence. This recipe honors those traditions while adapting techniques for a modern home oven.
In winter, add a splash of red wine to the braise for extra warmth and depth, or garnish with roasted winter squash for a heartier meal. In summer, lighten the plate with a citrusy slaw and serve tacos with a chilled cucumber-jicama salad. For holiday crowds, double the braise in two Dutch ovens or a large roaster pan and offer multiple toppings so guests can customize. Fresh herbs available in season—like epazote or summer cilantro—bring a pop of flavor that changes the profile subtly but deliciously.
Make the chili paste 2–3 days ahead and refrigerate in a sealed jar; it improves in flavor as the spices meld. Braise the meat the day before, then cool and refrigerate; when ready to serve, warm gently on the stovetop and shred. Pre-shred the cheese and keep it chilled in a sealed container. On the day, warm tortillas on a skillet and assemble tacos just before serving to keep exterior crisp. Pack consomé separately if transporting to maintain texture and prevent sogginess.
These birria tacos are a labor of love that reward patience with unforgettable flavor. Whether you’re feeding family, entertaining guests, or meal-prepping for the week, this approach delivers consistent, craveable results. Make it your own by adjusting heat levels, experimenting with proteins, and sharing the consomé-swaddled joy with the people you love.
Sear the beef in batches so you don’t crowd the pan — better browning equals more flavor.
Reserve at least 1 cup of the braising liquid as consomé for dipping; it’s the soul of the tacos.
Dip tortillas only at the top edge into consomé to prevent them from getting soggy while still imparting flavor.
This nourishing my fave birria tacos recipe is sure to be a staple in your kitchen. Enjoy every moist, high protein slice — it is perfect for breakfast or as a wholesome snack any time.
Yes — the chili paste and braised meat can be made up to 3 days ahead; store components separately and assemble just before serving.
Use canned chipotles to add smokiness; if you want a milder result, reduce them to 1-2 peppers or remove seeds.
This My Fave Birria Tacos recipe makes perfectly juicy, tender, and flavorful steak every time! Serve with potatoes and a side salad for an unforgettable dinner in under 30 minutes.
Soak the deseeded dried chiles in simmering beef stock for 15–20 minutes until soft. Blend with chipotles, crushed tomatoes, onion, garlic, vinegar, bay leaves and spices to a smooth paste, thinning with stock or water as needed.
Season beef chunks with salt, pepper and garlic powder. Heat oil in a Dutch oven and sear the meat in batches until browned on all sides, about 3–4 minutes per side. Remove and set aside.
Sauté diced onion in the same pot, add the chili paste and cook briefly. Add 4 cups beef stock and 2 cups water, return beef to the pot, bring to a gentle simmer for a minute.
Cover the Dutch oven and braise at 350°F for about 2 1/2 hours until meat is fork-tender and easily shredded. Check once to ensure adequate liquid remains.
Remove meat and shred with forks or shred directly in the pot. Scoop out 1 cup of the braising liquid, mix with chopped cilantro and set aside as dipping sauce.
Dip the top edge of a corn tortilla into the consomé, place in a lightly oiled non-stick skillet, add shredded beef, cilantro, onion and cheese, fold and toast until golden and cheese is melted. Serve with extra consomé and pico de gallo.
Last Step: Please leave a rating and comment letting us know how you liked this recipe! This helps our business to thrive and continue providing free, high-quality recipes for you.
Leave a comment & rating below or tag
@royalrecipe on social media!

Easy homemade thin-crust three-cheese spicy chicken and jalapeño pie — a flavor-packed pizza with a satisfying kick, perfect for pizza night or game day.

A bright, creamy BLT pasta salad tossed with basil pesto, fresh greens, cherry tomatoes, and crisp bacon—perfect for warm-weather gatherings and meal prep.

Tender sautéed shrimp tossed with spaghetti and a creamy sweet-spicy bang bang sauce—ready in under 30 minutes for a weeknight favorite.
Leave a comment & rating below or tag @royalrecipe on social media!
Enjoyed this recipe? Share it with friends and family, and don't forget to leave a review!
This recipe looks amazing! Can't wait to try it.
Comments are stored locally in your browser. Server comments are displayed alongside your local comments.
Join to receive our email series which contains a round-up of some of our quick and easy family favorite recipes.
