>>
30-MINUTE MEALS! Get the email series now →


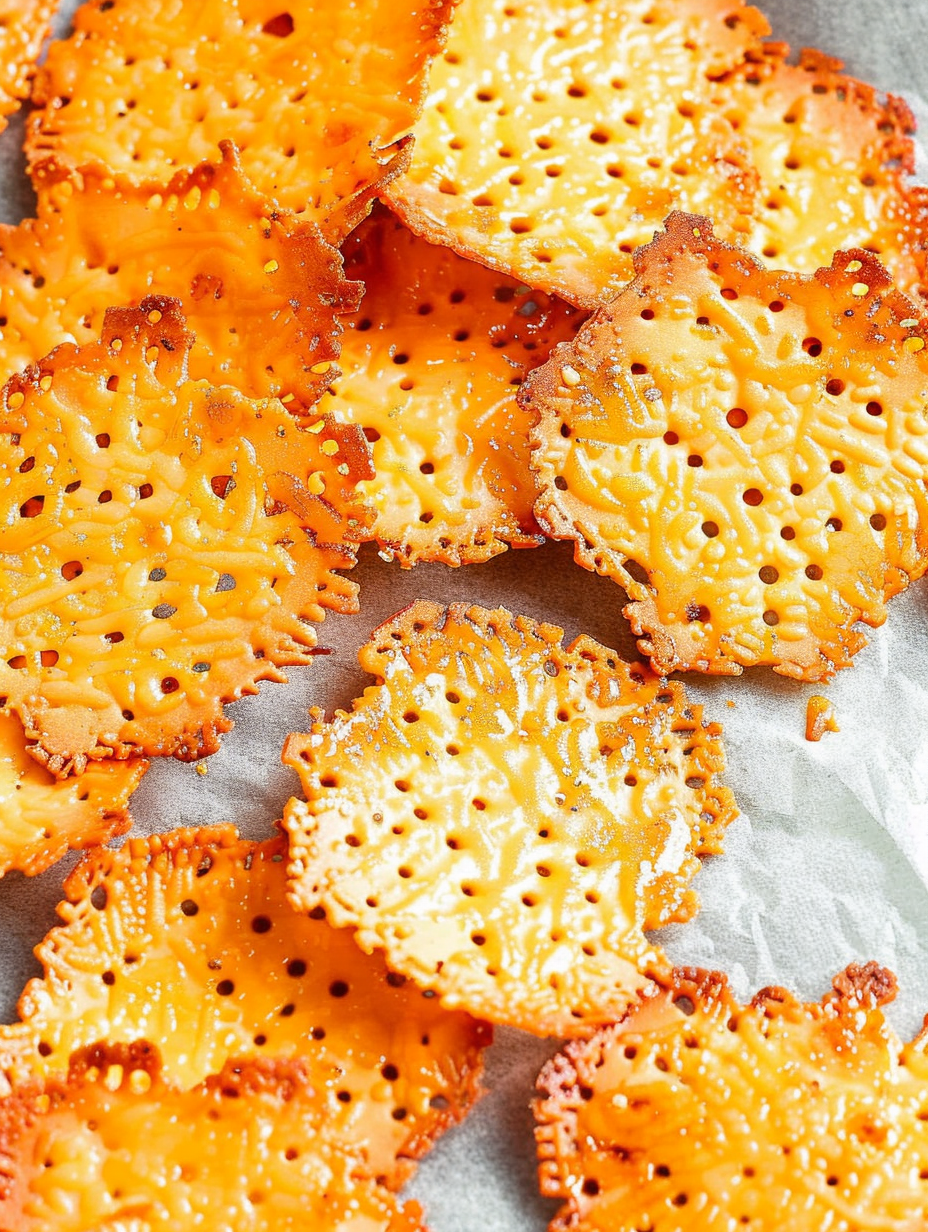
Crispy, savory baked cheese crisps ready in just 10 minutes—an inexpensive, customizable snack perfect for gatherings or a quick bite.

This simple baked cheese crisp has become my go-to answer for sudden snack attacks and last-minute party nibbles. I first stumbled on the idea when I wanted something crunchy, salty, and satisfying but without the carbs of crackers. A single cup of sharp cheddar stretched into a tray of golden crisps that vanished within minutes at a family gathering. The texture is addictive: the edges crisp to a delicate lace while the centers hold a slightly chewy, deeply savory bite. They are unmistakably cheesy, lightly browned, and deliver a clean, salty snap that pairs beautifully with dips or a glass of wine.
What makes these crisps special is how fast and forgiving they are. I discovered them on a busy weeknight when I had only shredded cheddar and a spice jar on hand; ten minutes later I had a crunchy plate to share. Over time I refined small details—small mounds of cheese for even spreading, a dash of garlic powder for depth, and the important grease-dabbing step to keep them crisp. They’re inexpensive, require minimal equipment, and the recipe scales easily from a solo snack to a crowd-pleasing appetizer.
I first served these at a poolside lunch and watched guests gravitate toward the baking sheet like it was beacon food. My picky teenager even swapped them for chips at a soccer party after trying the garlic-sprinkled version. Over time I learned to adjust cook time to get the exact edge color I like and to always use fresh shredded cheese for the best melt and texture.

My favorite part is how many small variations yield completely different snacks—herbed, spicy, nutty, or cheesy plain. Family members have started requesting specific versions by name, and I keep a small jar of pre-mixed spice blends on hand for quick customization. They are my favorite pantry trick for instant, impressive party bites.
Store cooled crisps in a sealed container layered between sheets of parchment paper to prevent sticking. Keep them in the refrigerator if you plan to eat them within a week—refrigeration preserves texture and flavor. For longer storage, freeze the crisps in a single layer on a tray until firm, then transfer to a freezer bag and press out excess air. To re-crisp, place in a 325 degrees Fahrenheit oven for 3 to 5 minutes—avoid microwaving, which will make them soggy. Look for a bright golden color and crisp snap as indicators of freshness.
Swap cheddar for finely grated Parmesan or Pecorino Romano for a sharper, saltier profile—use the same volume but expect faster browning. For a milder version, use Monterey Jack or Colby; they will spread more and require a touch longer in the oven. Try adding 1/4 teaspoon smoked paprika or 1/8 teaspoon cayenne per cup of cheese for heat. If you need dairy-free options, look for a very firm plant-based shredded cheese labeled for baking, though texture and crisping behavior will differ.
Serve crisps on a simple platter with small bowls of toppings: guacamole, hummus, or a tangy herb dip. They are excellent alongside charcuterie, balancing cured meats and pickles with a crunchy, cheesy element. For a casual snack, stack them with thin slices of apple or pear for a sweet-and-salty contrast. Garnish with finely chopped chives, flaky sea salt, or a drizzle of honey for a creative finger-food twist.
Cheese crisp concepts appear in many cuisines—think of Italian frico or Spanish cheese toasts—but this minimalist American approach emphasizes speed and portability. The technique of crisping cheese into delicate lacy rounds is rooted in practical cooking: turning surplus cheese into a crunchy garnish or snack. Over recent years, the trend has grown in low-carb and keto communities, where cheese crisps replace crackers and provide the satisfying crunch people miss from traditional grain-based snacks.
Adjust spices to reflect the season: in autumn, add 1/4 teaspoon ground sage and a pinch of nutmeg for a cozy twist; in summer, sprinkle fresh lemon zest and minced basil for brightness. Holiday versions work well with roasted, finely chopped nuts and herbs—pistachio and rosemary or walnut and thyme create festive color and texture. For warm-weather entertaining, serve with chilled dips like tzatziki or a cucumber-yogurt salsa to balance the richness.
Make a double batch when you have a spare 10 minutes and store extras in the fridge or freezer for quick snack assembly. Portion crisps into small resealable bags for grab-and-go snacks, or pack with individual containers of dip for packed lunches. If preparing for a gathering, bake crisps the morning of and keep them in a low-humidity airtight container; re-crisp in a warm oven for a few minutes just before serving to restore peak crunch.
These small, savory rounds are a go-to when I need something impressive with minimal effort. Try making a few flavored batches at once so guests can choose—watch them disappear and enjoy the little victories of simple, delicious food.
Final thought: experiment with cheese types and seasoning blends until you find your signature crisp. Once you do, they’ll become a reliable, delicious fixture in your snack rotation.
Use freshly shredded cheese from a block for best melting and texture; pre-shredded cheese can contain anti-caking agents that affect crisping.
Make uniformly sized mounds with a measuring tablespoon to ensure even baking and consistent crisp size.
Dab any excess surface oil with a paper towel while the crisps are warm to maintain a crunchy texture.
Space the mounds at least 2 inches apart because the cheese spreads significantly while baking.
This nourishing baked cheese crisps recipe is sure to be a staple in your kitchen. Enjoy every moist, high protein slice — it is perfect for breakfast or as a wholesome snack any time.
Store cooled crisps in an airtight container in the refrigerator for up to one week or freeze for up to three months. Re-crisp in a 325°F oven for a few minutes before serving.
Watch the crisps closely after 4 minutes—once the edges turn golden brown they are done. Ovens vary, so check frequently to avoid burning.
This Baked Cheese Crisps recipe makes perfectly juicy, tender, and flavorful steak every time! Serve with potatoes and a side salad for an unforgettable dinner in under 30 minutes.
Preheat the oven to 350 degrees Fahrenheit and place a rack in the center. Ensure the oven is fully heated for even baking.
Line a baking sheet with parchment paper. Use one or two sheets depending on batch size. Parchment prevents sticking and simplifies removal.
Drop 1 tablespoon mounds of shredded cheddar onto the parchment about 2 inches apart so they have room to spread evenly.
Sprinkle a light pinch of garlic powder on each mound and bake for 5 to 8 minutes, watching closely until edges turn golden brown.
Lift the parchment with the crisps to a cooling rack. Dab the tops gently with a paper towel to remove surface oil and preserve crispness.
Once fully cool, store in an airtight container in the refrigerator for up to a week or freeze for up to three months. Re-crisp in a 325°F oven if needed.
Last Step: Please leave a rating and comment letting us know how you liked this recipe! This helps our business to thrive and continue providing free, high-quality recipes for you.
Leave a comment & rating below or tag
@royalrecipe on social media!

Easy homemade thin-crust three-cheese spicy chicken and jalapeño pie — a flavor-packed pizza with a satisfying kick, perfect for pizza night or game day.

A bright, creamy BLT pasta salad tossed with basil pesto, fresh greens, cherry tomatoes, and crisp bacon—perfect for warm-weather gatherings and meal prep.

Tender sautéed shrimp tossed with spaghetti and a creamy sweet-spicy bang bang sauce—ready in under 30 minutes for a weeknight favorite.
Leave a comment & rating below or tag @royalrecipe on social media!
Enjoyed this recipe? Share it with friends and family, and don't forget to leave a review!
This recipe looks amazing! Can't wait to try it.
Comments are stored locally in your browser. Server comments are displayed alongside your local comments.
Join to receive our email series which contains a round-up of some of our quick and easy family favorite recipes.
